How to adjust a coffee grinder
- 14 Jan 2021
How confident are you that your coffee grinder is adjusted correctly? That your grind best suits your brewing method? Or that it hasn't gone out of adjustment since you first set it?
If you want to know when your coffee grinder needs adjusting and how to adjust your coffee grinder - you've come to the right place.
See, your coffee grind affects everything about your coffee... which is why it's important to know how to identify when your coffee grind needs adjusting and in what direction. How your coffee grind affects your espresso shots. And most importantly – how to make grinder adjustments on the fly.
Reasons why the grinder needs to be adjusted
There are two reasons why you might need to adjust your grinder. One is the age of your coffee beans, and the other has more to do with the weather – or more specifically the humidity in the air.
As coffee beans age, their natural gas content decreases and coffee shots will start to slow down. This is usually between weeks 2-5, when they become their most stable and predictable. However, once you finish this bag and put a fresh lot of coffee from a different roasting date in your grinder, you may see your previously perfect espresso shots speed up a little. This is because they contain a little more gas than your aged coffee, and it may make them run more quickly. To slow your shot back down, you will need to make your grind finer.
A far more common, or regularly noticeable reason your grinder will need an adjustment is due to humidity. The hopper and/or dosing chamber on your grinder is not airtight, and allows any moisture in the air to get in and be absorbed by your coffee beans. This causes the beans to swell a little, and take up more space than they were previously – they start to act finer than they really are. This may cause previously perfect espresso shots to start to run too slowly, you may even see some slow dripping instead of a nice steady stream. To speed your shot back up, you will need to make your grind coarser.
How often you need to adjust the grind
Grinder adjustments are required far more often than you think, but once you learn how to do this accurately it won’t be stressful or time consuming. If it is the age of your coffee beans affecting your shot (check the roast date of your bag of coffee to confirm), this will most likely only need to be done each time you change to a new bag of coffee.
The weather, however, can change daily – sometimes even multiple times a day. In a commercial cafe setting, it is common to make small adjustments to the grinder a few times in one day. At home, this is much less likely. And this is simply due to where you keep your grinder. In a café, customers are streaming in and out of doors, sometimes the grinder may be in an open setting where natural air is moving all the time or near a hot kitchen. This means that the humidity in the air will fluctuate constantly with the weather in real time. In settings that are more closed and possibly air conditioned, you will see weather-related extraction times become less common.
Grinding your coffee coarser VS finer
How coarse or fine you grind your coffee particles is going to have a huge effect on how your coffee pours out of you group head. Think about it like having one bucket of rocks, and one bucket of sand – both with holes in the bottom. You pour the same amount of water over both, but the water takes very different times to travel through. When it comes to extracting coffee, we want to control the particle size in order to make sure our extraction happens in the ideal amount of TIME. And the ideal extraction time for a 30ml espresso shot is between 15-20 seconds for a single shot basket, or 25-30 seconds for a double shot basket. Basket sizes vary, so the key here is to weigh the amount of coffee you are using in your basket and ensure it's the same each and every time.
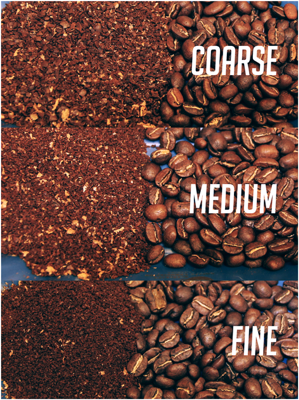
Why your extraction time and coffee grind is so important, and how it effects your overall coffee
The time it takes for you espresso to come through your group head is what is referred to as extraction time. Just like baking, coffee has an ideal ‘cooking’ time. When the extraction time is in the right range, you will produce an espresso shot that is the right balance of oil, acid and sugar. When the time takes too long, you can end up with an espresso shot that tastes bitter and acidic – almost a little bit burnt. In the extra time your coffee was in contact with the water, it started to pull through some of the more unpleasant flavours naturally pleasant in coffee, and we want to limit that. When the time is too short, your espresso may taste sour and watery, and may be very light in colour. In this case, the water passed through the coffee too quickly to pick up all the oil, acid and sugar – the parts that taste good.
The time it takes for your espresso shot to be produced – from the moment you hit the button or pull the lever on the machine, to the time it finishes, is the most important indicator of how your shots are pouring and how good they are going to taste. This is why we will use a timer in the upcoming exercise to make sure we are making progress in adjusting our grinder in the right direction, by the right amount. We want to get our cooking (extraction) time right.
Why you should make sure your dose stays the same whilst making a grind adjustment
While we make adjustments we want to make sure our coffee dose stays the same so we can be sure that the change in our extraction time is due only to our grinder adjustment – and not because we put too little or too much coffee in the basket. We are going to use the manual dosing method while we adjust our grind – or ‘grind as you go’ method, to minimise the wastage of our coffee through the process.
First we are going to use a set of scales, place the group handle on the scales are tare it off so it read zero. Then use the manual dosing method to fill the basket correctly. When done correctly, the manual dose is always the correct one. Over time, you will not need scales to verify that your dose is correct, your good habits and instincts will take over.
The top mistakes people make when making an adjustment
There are two common mistakes people make when they start out with grinder adjustments. The first mistake they make is forgetting to clear out the old grind size after changing the adjustment collar. They will then make a second, unnecessary adjustment and end up over-correcting. The second mistake is over-adjusting. This is easy to do until you get the hang of it. The secret lies in understanding the little notches on your adjustment collar.
The 3-5 seconds per notch rule
Every grinder – commercial and most home models – will have some form of notches or markings on the adjustment collar indicators. If you have a close look at them, no matter the style they appear in, you will notice they are all around 3mm apart. And every 3mm – or one notch – adjustment you make will generally change your extraction time by between 3-5 seconds. Which is quite a lot of difference for such a miniscule adjustment. You will find that some griners are slightly more or less sensitive, and that is where getting to know your specific equipment is important. So adjustment collars are a lot more sensitive than people realise, it really is almost just a twitch to the left or right to fix the problem.
How to adjust your coffee grinder
Make adjustments of only 1 notch at a time, though with experience you may recognise it needs a bigger adjustment than that and choose to move it two notches. Moving it 1 notch at a time when you’re new to grinder adjustments can help minimise the chance you might over correct.
We make our grinder adjustments based off a 60ml extraction. You can do what works for you, but we do this because if we get our 60ml double shot pouring in the right time frame, the 30ml single shot will automatically fall in line. But same isn’t always true the other way around.
If your coffee is running fast, slow the extraction back down to an acceptable time frame, by moving the adjustment collar 1 notch towards the finer side. Turn my grinder on for around 10 seconds to clear that chamber out, then discard all of the old grind size. It's about here that you start to see why the manual dosing method is a bit better for reducing wastage than filling the entire chamber up.
Repeat this process of timing and adjusting until you hit the right time frame.
Now, making grinder adjustments can be a little like maths. If we have a 60ml double shot that is pouring at 15 seconds, that is much too fast. In fact, it’s half the time it should take. Knowing each notch could adjust it up to 5 seconds, we may make a 3 notch adjustment towards finer straight away and then check it. On the flip side, if our 60ml double shot is pouring very slowly and takes 45 seconds to come through, we make a 3 notch adjustment towards the courser side. And if your shot time isn't that far our, you may only need half a notch.
How to make sure you don’t lose your “safe range” when adjusting the collar
You could use a little trick to help remember where the “safe range” should be. Every time you make a big adjustment on the grinder, place a mark using a marker on the collar and match it up with a mark on the base so if you make a total mess of it you can always line the marks up and start again. It is normal for the top mark to be sitting a couple of notches either side of the bottom mark, due to the frequency at which the grind needs to be changed, and the bean age and humidity changes as we've mentioned – but at least you know roughly where it was pouring well last time. You can cut down the confusion and time spent significantly.
How to label your grinder or hopper, to help you remember the process under pressure
Sometimes it can be hard to remember which way to turn your adjustment collar to either speed up or slow down unsatisfactory shots, especially when if you are working in a high pressure environment. In this case it might help to put a little sign on your grinder hopper until you get used to it, indicating which way to adjust if your shot times are to long or too short, along with the time guidelines to help remind yourself or others using the machine.
Adjusting an Electric Coffee Grinder
Electric or digital grinder adjustments go through fundamentally the same process as adjusting manual grinders, with an added step at the end to check that the automatic timed dose is giving you the right amount of coffee.
All electric grinders will have a function on them that allows you to grind on demand, or manually grind as well as the programmed dose buttons. Once you find that you are getting the right extraction time with a manual dose – check and adjust your automatic dose. The automatic timed dose should closely match the manual dose.
The reason you want to do it in this way is because how coarse or fine your grinder is set will change the timed dose. When you make an adjustment finer, your grinder blades work more slowly – giving you less coffee in the programmed time. The opposite is true when you make an adjustment coarser, your grinder blades will work faster, which give you more coffee in the same programmed time.
In order to avoid having to adjust two things simultaneously, it is easier to do all your grind adjusting using the manual dosing method, and then adjust your timed dose at the very end when you have found the sweet spot!
There are a couple of other things to take into consideration when operating an electric grinder.
Firstly, how full your bean hopper is will have an effect on your dose, most noticeable when the hopper is getting towards empty. This is because with less beans in the hopper, the weight of gravity pressing the beans through your blades is less – so less coffee will be ground in the programmed time. Try to make a rule that you keep your hopper half full at all times, and go back to using the manual dosing method if you need to run it down.
The second thing to be aware of is that even with your best efforts in adjusting and monitoring the grinder, you will still get what is called “freak” doses. These will cause the occasional shot to run very fast or very slow, compared to all the other shots that are extracting in the right range. This is because most of your doses will be made up of a mixture of large and small beans falling through the blades during the programmed dose. Occasionally, you will get a dose made up of only large beans or only small beans. This increase or decrease in surface area simply means that you will get occasional over or under doses. It is my advice that you simply discard the “freak” shot and continue on rather than adjusting the grinder because of one bad shot. If you notice that all your shots start to run a little longer or shorter, it is then worth making an adjustment.
Different grinders for different brewing methods
While the above guide will suit the majority of coffee grinders, some speciality grinders or hand grinders may work slightly differently. Or in some cases you may find that a grinder won't grind finely enough for espresso or Turkish coffees. Which is why it's important to understand the differences between coffee grinders before you order one. For help finding the right coffee grinder for you, check out our coffee grinder buyer's guide.
Can't decide which coffee grinder is right for you? Check out our coffee grinder buyer's guide!

